One-click Deployments for iOS Apps using Xcode 8 and More
Exploring tools to provide a seamless Continuous Delivery experience for your iOS team.

iOS Engineer – Zalando Lounge
The macOS Server 5.2 is a new fruit. It was released (almost) in parallel with Xcode 8 and might come as no surprise that it is the minimum required version by Xcode 8, which also spans new territory. Most importantly, it’s the name change. Say goodbye to OS X Server as now you have macOS Server. But changes go beyond that: While not being mentioned in the changelog, the good old “_xcsbuildd” user is now gone.
So what was this “_xcsbuildd” user? It was a system user that your bots ran under up to OS X Server 5.1.x. This led to a few inconveniences and crypticness, but thankfully this is all you need to know nowadays. Instead of the “_xcsbuildd” user, you can now pick one of your existing macOS users or even create a new one. This is so convenient.
In this article we will explore a way to set up an Xcode Server along with Fastlane tools to provide a seamless Continuous Delivery experience for your iOS team. We will address some complexities such as having multiple apps (with different bundle IDs), bumping the build numbers automatically, and submitting it all on on iTunes Connect (ITC). We will try to keep things as simple and straightforward as possible.
This process was created during my everyday duties in the iOS team of Zalando Lounge. We have two mains apps ( Zalando Lounge, Zalando Privé) which are identical, but uploaded to the App Store as different binaries for localization reasons. In addition, each one of our apps comes in three flavours (Staging, Live, AppStore) which point to different backend environments and use different API keys. We have a single Xcode project for all of these and one target for each app flavour (six in total). Deploying six apps to ITC every few days is annoying and time consuming. Continuous Delivery to the rescue.
For the sake of simplicity, in this article we will use 2 instead of 6 app targets named MY_SCHEME1 and MY_SCHEME2 respectively. You can easily replicate the existing lanes for as many targets you want.
Section 1: Xcode Server
The first thing we need to care about is setting up an Xcode server. We assume you are working locally on the server machine. See below for the steps involved.
- Install macOS Server and enable Xcode Server. When prompted for a user, create a new one named ‘xcodeserver’.
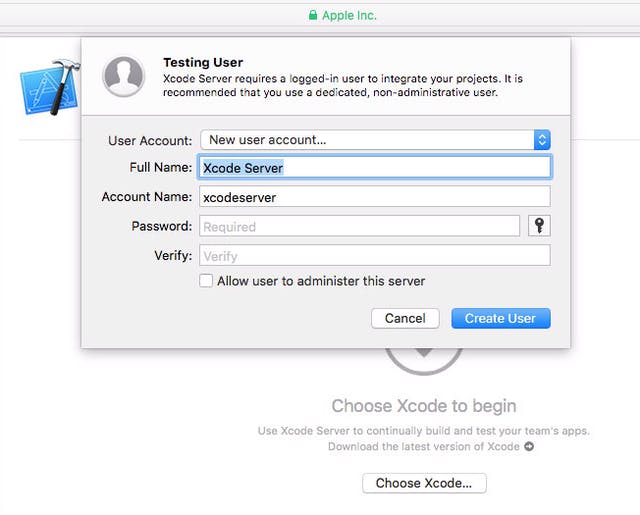
- Follow the wizard and when done, logout of macOS and login as the newly created ‘xcodeserver’ user.
- Make sure you have an email for our new user. iCloud is fine.
- Create a separate account in developer.apple.com and ITC. We will use these accounts to package and distribute our app. The user needs to have the ‘app manager’ role under ITC.

At this stage, we can leave Xcode Server be. We now move over to Fastlane.
Section 2: Fastlane
What is Fastlane? It’s a feature-rich toolkit that helps iOS (and Android) developers automate many of the tasks involved around app deployment.
- Install Fastlane following the instructions on the public repository. We need version 1.107.0 as the minimum, since we are using commands that were added very recently.
- Take special care with the ‘update_fastlane’ command that we need to support, as this requires special setup.
- Open terminal and add ‘cd’ to your project’s root folder.
- Now create a ‘fastlane’ folder with a ‘Fastfile’ and ‘Appfile’ inside. The contents of our files are the following:
### Appfile ###
(https://gist.githubusercontent.com/fotiDim/68f2614a7cb37bb0595473039c33b348/raw/50ad741b90eab9254714148c53907ce5ee9382f7/Appfile)
team_name "MY_TEAM_NAME"
team_id "MY_TEAM_ID"
for_platform :ios do
  for_lane :MY_SCHEME1 do
      apple_id MY_APPLE_ID1_STAGING
      app_identifier "MY.BUNDLE.ID1.STAGING"
  end
  for_lane :MY_SCHEME2 do
      apple_id MY_APPLE_ID1_LIVE
      app_identifier "MY.BUNDLE.ID1.LIVE"
  end
end
apple_dev_portal_id "MY_DEV_PORTAL_EMAIL"  # Your Apple email address
itunes_connect_id "MY_ITC_EMAIL" # Your iTunes Connect email address

### Fastfile ###
(https://gist.githubusercontent.com/fotiDim/68f2614a7cb37bb0595473039c33b348/raw/50ad741b90eab9254714148c53907ce5ee9382f7/Fastfile)
fastlane_version "1.107.0" # Minimum required fastlane version. Find your version with: gem list fastlane"
default_platform :ios
platform :ios do
  ########## Before ##########
  before_all do
      update_fastlane
      reset_git_repo(force: true) # Ensure that no artifacts are left when you build the app.
      ensure_git_status_clean
      git_pull
      increment_build_number({
        build_number: latest_testflight_build_number(
          initial_build_number: 0, # Sets the build number to given value if no matching uploaded build is found
          app_identifier: 'MY.BUNDLE.ID1.STAGING' # One of our app targets gets to be the guide for build versions. It is expected to be always uploaded first.
        ) + 1,
      })
  end
  before_each do
      clean_build_artifacts
      clear_derived_data
  end
########## On Error ##########
  error do |lane, exception|
      reset_git_repo(force: true)
  end
########## Lanes ##########
  desc "Deploy all versions of the app"
  lane :all do    # This is a convenience lane that executes all other lanes
      MY_SCHEME1
      MY_SCHEME2
  end
desc "Deploy MY_SCHEME1"    # Lane for app target 1
  lane :MY_SCHEME1 do
      gym(
        scheme: "MY_SCHEME1",
      )
      testflight(
        skip_submission: false,
        distribute_external: false,
        app_identifier: "MY.BUNDLE.ID1.STAGING"
      )
  end
desc "Deploy MY_SCHEME2"   # Lane for app target 2
  lane :MY_SCHEME2 do
      gym(
        scheme: "MY_SCHEME2",
      )
      testflight(
        skip_submission: false,  # Refers to submission for external testing (not App Store)
        distribute_external: false,
        app_identifier: "MY.BUNDLE.ID1.LIVE"
      )
  end
########## After ##########
  after_all do
      clean_build_artifacts
      clear_derived_data
      commit_version_bump(
        message: "Bumping Build Number to: " + Actions.lane_context[SharedValues::BUILD_NUMBER], # create a commit with a custom message
        xcodeproj: "../MY_PROJECT_FOLDER/MY_PROJECT.xcodeproj", # optional, if you have multiple Xcode project files, you must specify your main project here
      )
      add_git_tag tag: Actions.lane_context[SharedValues::BUILD_NUMBER]
      push_to_git_remote
  end
end
Pay attention to the comments in the file. The key points here are:
- We let Xcode deal with provisioning profiles and code signing. The main actions we use from Fastlane is Gym, which builds the app, and Testflight, which uploads the builds to ITC.
- Remember to edit the above files with your own credentials and keys. To help you find the places you need to edit easier, I have made them start with a capitalised ‘MY’. Whatever starts from ‘MY’ is supposed to be replaced by your own values. Don’t just copy paste, as you need to understand what is going on. The good news is, unlike other examples, the above is written for maximum readability.
- Make sure you commit your changes before each run of the script, as it includes a command that resets the repository. This is to ensure that no artifacts are left when you build the app.
- After you’re done, go to the Fastlane folder you previously created and using your terminal, execute ‘fastlane all’. During the first run, the script should occasionally ask you for credentials. After your enter them, they are stored in the keychain and from the second run onwards the script should be able to run unattended.
- When the script is complete, a git tag is added and pushed to your repository that indicates the exact code base for the current build number. Build numbers are unique and incremented by one each time you run the script.

Section 3: Configure our bots
After we manage to run and deploy our app using the Fastlane script, it is time to set up an Xcode Server bot so that we can execute one-click deployments.
As bots can only build a single scheme, we will ignore this build and instead use the builds generated by Fastlane’s Gym. As a reminder, we have 2 targets, thus we need 2 different builds to happen.
- Create a bot called ‘Deployer Bot’. Point it to your repository and desired branch.
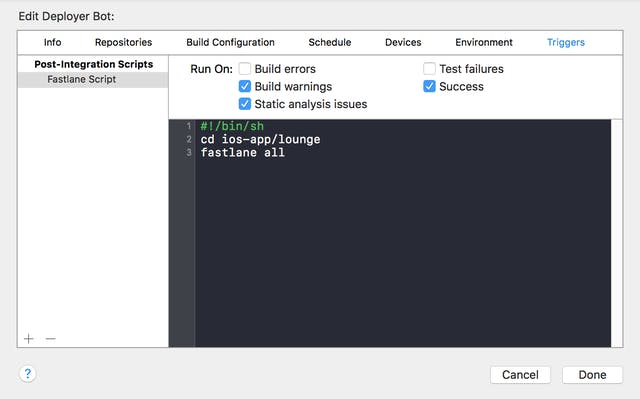
- The build configuration should be as shown below. Feel free to enable the analyze or the test action if you think they are needed.
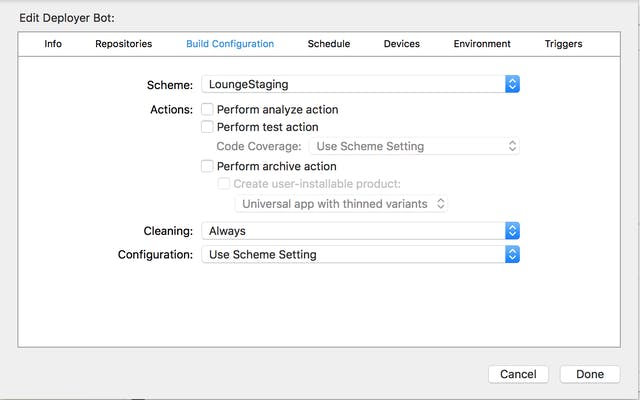
- Schedule it to run manually.
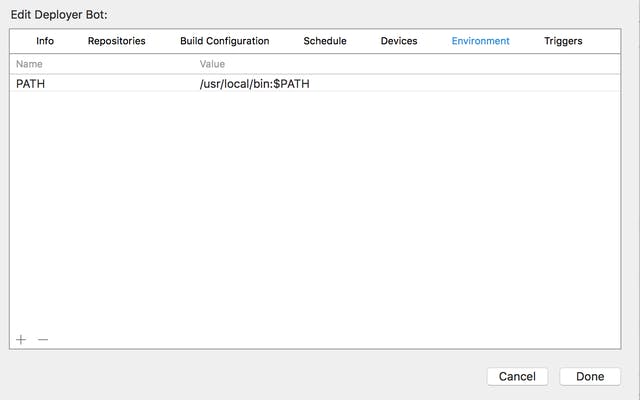
- In the environment tab you need to set the ‘PATH’ variable to ‘/usr/local/bin:$PATH’ in order for the bot to be able to discover the Fastlane binary.
- Add a Post-Integration trigger.
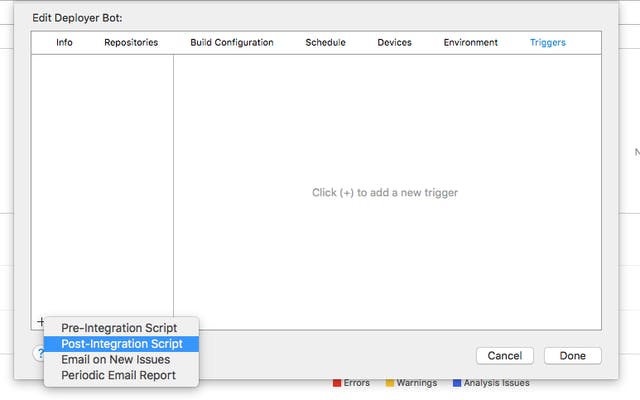
- Make it run only on the success and build warnings/static analysis issues. Since bots run on the root folder of your repository, you need to continuously deliver to the project folder before running the Fastlane command:
1 2 3 | |
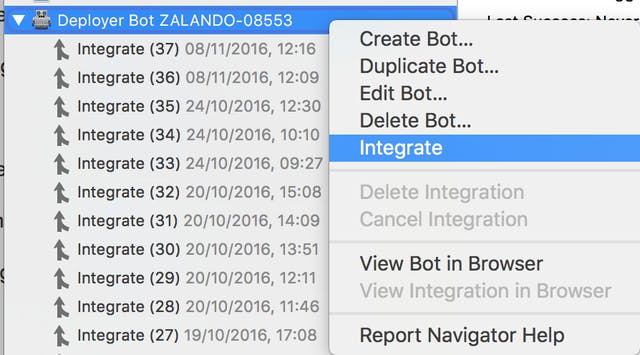
That is it! You can now do the following:
As a closing line, I would like to mention something that I wish was better about the process in general. As bots can only build one scheme, this means we have to ignore their build and instead rebuild our targets with Fastlane. This is a waste of time and raises the question: “do we really need the Xcode bot?”. The answer to that is probably not, but it is convenient to have one-click deployment without having to resort to terminal and remembering commands off-hand. Perhaps on a future Xcode Server version we can hope for bots that either skip the build process, or are able to build multiple schemes.
Happy deploying!


